
Do you know about Microsoft’s OneDrive? It’s a file-hosting service that allows users real-time access to information saved in the cloud. It’s especially associated with Microsoft Office 365, and comes with one terabyte of cloud storage. (There’s also a free tier where you can get 5GB storage without paying anything.) OneDrive is often used to save documents generated in Word, Excel, Powerpoint and OneNote. Windows 10 includes a way for users to access OneDrive files more simply and selectively, so let’s take a look at how to sync files and make the most of this feature.
In Windows 10 OneDrive is pre-installed. It’s also built into the File Explorer app. This makes it easy to sync files, as well as making file security stronger. All you need to do is drag-and-drop the file you want to save to OneDrive. But do you want to sync your entire OneDrive with your PC? People often use the cloud for particular purposes only. They don’t want everything in the OneDrive folder to be available on the computer they’re working on. Microsoft recognized this, and so it’s possible to sync files that you want to be visible with Windows 10 and leave others out. This is how you do it:
Here’s how:
-
- Select the white (or blue) OneDrive cloud icon in the Windows taskbar notification area:

- Select the white (or blue) OneDrive cloud icon in the Windows taskbar notification area:
-
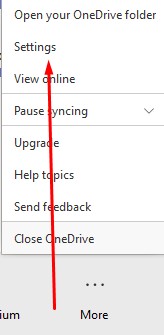
- It will open a pop-up screen. In this screen select More > Settings.

- It will open a pop-up screen. In this screen select More > Settings.
-
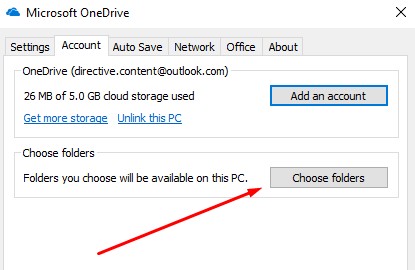
- Select the Account tab, and select Choose folders

- Select the Account tab, and select Choose folders
-
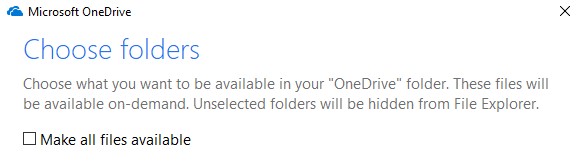
- You have to make sure the “Make all files available” box is toggled off:

- You have to make sure the “Make all files available” box is toggled off:
Now you’ll have the option to sync files and select which files you want to be visible. Click ‘OK’ and the files you want to be synced with Windows 10 will be available in File Explorer.
Do you want more information, and tips and tricks to make you more productive and efficient? Call the IT experts at Quikteks today at (973) 882-4644.